Creating Your First Application
Learn how to create a Hello World Microlam app. This guide covers:
-
Bootstrapping an application
-
Testing the application
-
Packaging of the application
-
Deploying to AWS
1. Prerequisites
To complete this guide, you need:
-
from 15 minutes to 1 hour
-
an IDE
-
JDK 21+ installed with
JAVA_HOMEconfigured appropriately (The best is to use Amazon Corretto build of OpenJDK) -
Apache Maven 3.8.1+
|
Verify Maven is using the Java you expect
If you have multiple JDK’s installed it is not certain Maven will pick up the expected java
and you could end up with unexpected results.
You can verify which JDK Maven uses by running |
Microlam is running docker using the exec-maven-plugin and the maven-toolchains-plugin.
You need to configure your paths (so docker command can be found) in the toolchains.xml file in ~/.m2/toolchains.xml like this:
<?xml version="1.0" encoding="UTF8"?>
<toolchains>
    <toolchain>
        <type>paths</type>
        <provides>
            <id>binaries</id>
        </provides>
        <configuration>
            <!-- Defines the folders to search for binaries of the "paths" toolset -->
            <paths>
                <path>/usr/local/bin</path>
            </paths>
        </configuration>
    </toolchain>
</toolchains>
2. Architecture
In this guide, we create a straightforward application serving 2 endpoints mult and sum with a REST API:
-
POST /mult -
POST /sum
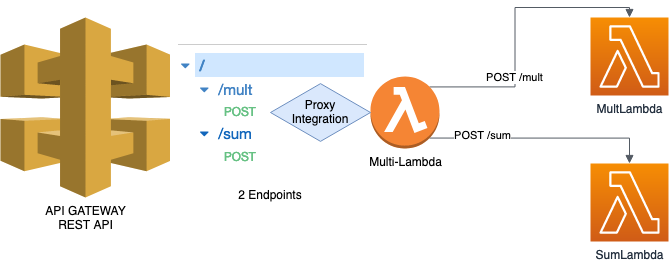
The 2 endpoints are connected to the same lambda via Proxy integration.
Both receive a json body of the form:
{
"arguments" : [ 2, 4, 6]
}
The expected response will be a json of the form:
{
"result" : 12
}
The result will be the sum or the product of the arguments depending on the respective endpoints /sum or /mult.
3. Bootstrapping the project
The easiest way to create a new Microlam project is to open a terminal and run the following command:
In your CLI:
mvn archetype:generate -DarchetypeGroupId=io.microlam -DarchetypeArtifactId=microlam-lambda-quickstart -DarchetypeVersion=0.9.10You will have to answer a few questions:
-
Choose a
groupId,artifactId,versionandpackagefor your new project -
Choose your
awsBucket: this is the name of an S3 bucket where the lambda artifacts will be deployed -
Choose your
awsProfile: this is the name of your AWS profile -
Choose your
awsRegion: this is the name of an AWS region (ex:eu-west-1) -
Choose your
lambdaName: this is the name of your Lambda must be also suitable as the name of the Java class for the Lambda.
|
In case you provided incorrect values for
awsBucket, awsProfile or awsRegion, no problem!It is very easy to set these values afterwards:
Change the file |
4. Discovering and working with the generated project
4.1. The Java code in src/main/java
Let’t take a concrete example:
-
groupId=tech.solusoft -
artifactId=microlam-demo -
version=1.0-SNAPSHOT -
package=tech.solusoft.demo -
awsProfile=microlam -
awsRegion=eu-west-1 -
lambdaName=MicrolamDemoLambda
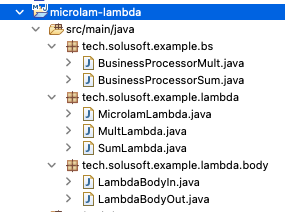
Once generated, import the project into your prefered IDE, this is what you will find in src/main/java:
-
In the
[package].bsfolder, you can find the business services (separating the business operations from the AWS code is a good thing). -
In the
[package].lambdafolder you can see 3 classes providing the Lambda entry points, in fact, only one (hereMicrolamLambda) will be deployed to AWS (One good reason for that is to ensure this lambda will be more hot).MultLambdaandSumLambdaare really doing the work. -
In the
[package].bodyfolder you can seeLambdaBodyInandLambdaBodyOut, they are POJO representing what expect the lambda as Input and what to expect from its output. -
In the
[package].paramsfolder you can find the classSystemParametersgiving you access to System Manager/Parameters, there is only one parameter currently :DEBUG -
In the
[package].logfolder you can find the classLoggingConfigurationwhere you can configure your Logging. -
In the
[package].awsfolder you can find the classAwsClientswhere you can put all your AWS Clients as singletons (they are thread safe). Currently there is only the SSM Client (for System Manager).
Let’s see the code for one of our Lambda (MultLambda):
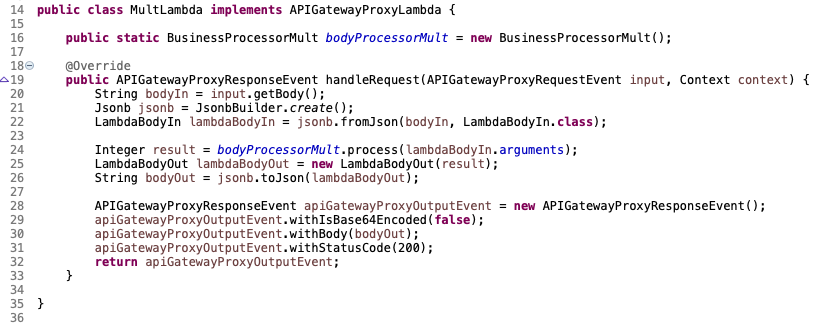
You can see the MultLambda code is very simple (as SumLambda), using the business service as a singleton (line 22), implementing the interface APIGatewayProxyLambda only method handleRequest.
Note the use of the Jsonb and Jsonp to convert from/to json to/from our POJOs (lines 31 and 35).
As we said, we use MicrolamDemoLambda as a proxy to redirect the call to MultLambda and SumLambda depending on the target resource /mult or /sum:
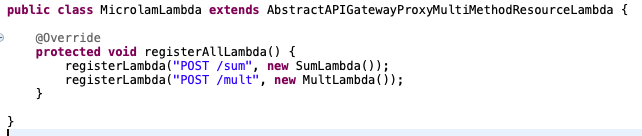
As you can see, MicrolamDemoLambda implements the registerAllLambda() method from its abstract mother class and map each endpoint to a given lambda (it may be the same), the mapping is:
[METHOD][SPACE][RESOURCE] -> LambdaWhere:
-
[METHOD] is
POSTorGETorPUTetc… (the Http Method) -
[SPACE] is the space character
-
[RESOURCE] is the resource for AWS, or endpoint (here
/multor/sum)
Also you can find the static bloc where AwsClients and LoggingConfiguration are configured lines 14-17.
Lines 25-29, this code allow to update the LogLevel using the SystemParameter DEBUG. this code needs to be there to avoid SnapStart for freezing it in its snapshot.
|
Solving the aggregated log problem
As only the |
4.2. The pom.xml
You will find the import of the Microlam BOM, allowing you to omit the version on the different Microlam dependencies, but that’s not the main point.
What is original is that, you will not find any microlam-maven-plugin that will hide all the work that is made magically to compile or configure your native compilation.
One of Microlam value is to be easily hackable, because on a simple example, the magical solution may work, but what happens when it does not ? Microlam is designed with the idea that your project is enough complex to not work with a magical solution. In fact, this Quickstart project will not compile magically because of the usage of Gson (using reflection) to Map from/to json to/from the POJOs for example… So Microlam will help you generate the configuration for the compilation.
Microlam is providing everything inside this pom.xml, helping you compile, generate the Java Deployment package for your Lambdas and also help you compile natively your project with GraalVM Native Image. In order to offer an uniform development experience (for linux, MacOS or Windows developer), Microlam is using Docker for compiling natively and building the Lambda Custom deployment package containing your compiled code.
The pom.xml allow you to achieve different goals:
4.2.1. Generating the Lambda Java Deployment package
Use simply the java maven profile:
mvn packageThis command build the Lambda Java deployment package in target/ folder with the name [xxx]-aws-lambda.jar.
|
Profile -Pjava
Generating the Lambda Java deployment package is coming from the profile |
|
Which Java version to choose ?
Currently AWS supports |
|
How to use Java 20 or Java 19?
First modify the pom.xml property: |
|
Why we need the Java Lambda if we can compile to native ?
It is important to reduce the developement cycle develop-test-develop as much as possible. It may be a good idea to develop and test your Java Lambda because it is very fast and to compile only when needed. This is the same code, so it should be ok. |
4.2.2. Configure, Compile and Generate the Native Lambda Deployment Package
For an introduction to the subject of Native compilation for Java, you can refer to this article.
The native build is depending on the java version (java11, java17, java19 , Java20 or Java21) and the target architecture (amd64 or arm64).
You need to provide this information in the maven command line using -Dnative=javaXX-axx64 (by replacing XX and xx with the correct values).
Let’s say your target is java17-amd64, if everything is ready, you just have to use this maven command:
mvn package -Dnative=java17-amd64 -PcompileIn case the build is successful, the Native deployment package is in the target folder with the name [xxx]-aws-lambda-native.zip.
But generally, this build will not work immediately and if it works, the resulting compiled code will not work at runtime. Actually, the GraalVM native-image tool is compiling only the code that is necessary using a static analysis, which is not covering the cases of usage of Java Reflection for example, in our case, our use of Gson… that’s why we need to provide an additional configuration to the tool.
The solution proposed by Microlam is to generate this configuration automatically by the GraalVM Tracing Agent while you are running your integration tests on it.
This can be done by this maven command:
mvn package -Dnative=java17-amd64 -PconfigAt the end of the build, a container is running, letting you run your tests on it :
In our case, you can run the Junit Tests in the class in [xxx].devops.LocalLambdaTests.
The generated configuration is updated (and merged) every 30s in the folder: target/[artifactId]-[version]-native-config/java11-amd64/function/config/.
You can manually copy the files to the folder src/main/resources/META-INF/native-image/[groupId]/[artifactId]/.
Then it is a good idea, to compile again the Native lambda which can be done with this command:
mvn package -Dnative=java17-amd64 -PcompileThis will copy the Native deployment package to the target folder with the name [xxx]-aws-lambda-native.zip.
Then test locally the result of your compilation:
mvn package -Dnative=java17-amd64 -PrunAt the end of the build, a container is running, letting you try your native lambda locally.
In our case, you can run again the Junit Tests in the class in [xxx].devops.LocalLambdaTests.
If everything is working as expected, you are ready to generate your deployment package.
|
Using Oracle GraalVM instead of GraalVM CE
You may use Oracle GraalVM instead of GraalVM CE by using the parameter |
4.3. The Native configuration
It is found in the src/main/resources folder:
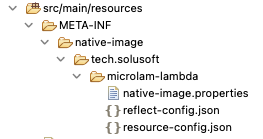
See how to generate this configuration using the config profile.
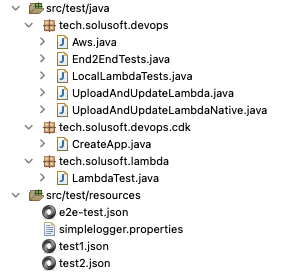
4.4. The Java code in src/test/java
This is what you will find in src/test/java:
-
In the
[package].devopsfolder, you can find code to help you test and deploy your Lambda. -
In the
[package].devops.cdkfolder, you can find the classCreateAppincluding all what is necessary to deploy the complete Application to AWS using AWS CDK. -
In the
[package]folder, you can find the ClassLambdaTest, which show you how to test your Lambda code without testing the Lambda Machinery for Unit testing.
4.5. Deploying your Application with the CDK
|
Bootstrapping your project for the CDK
You need to bootstrap your project before using the CDK only the first time.
For this, inside the project root folder, use the command: |
Using the AWS CDK is the recommended way to deploy your App and to maintain it during development.
As you develop, modify CreateApp if necessary, for our example, you need to apply a few changes to set the function Runtime, Architecture and Code according to your needs, because by default it deploys the Java Lambda Package.
Then use this command to deploy or synchronize your deployment:
cdk deployThe Aws class is used for holding the Aws configuration used by the CreateApp class for the CDK deployment.
When you develop your lambdas, it is possible to run simply the unit test in UploadAndUpdateLambda to upload your java deployment or UploadAndUpdateLambdaNative to upload your native deployment.
In case you want to clean everything on your aws account, you just need to run:
cdk destroy5. Logging
By default, the project is now using SLF4J with slf4j-api-2.0.7.jar and slf4j-jdk14-2.0.7.jar with a custom Handler for AWS Lambda from microlam-java-logging with these features:
-
Support for Default Runtime & Custom Runtime (without configuration change)
-
Possible to opt for Json Logging by changing a flag to true (
LoggingConfigurationclass) -
Use of System Manager/Parameter
DEBUGset to"true"`to dynamically log to DEBUG with current deployment.
You can change the configuration by updating the class LoggingConfiguration.
All the logs will be found in CloudWatch as usual.
For understanding the Java Aws Lambda Logging problem you can refer to this article.